The action of submitting a Google Form is an event with an associated array of values corresponding to an ordered list of the user's responses. If you're anything like me and find it easier to work with named variables rather than numbers, creating your own object might help. This way you will be able to reference the values without constantly having to count which question they are taken from - which can be especially confusing as we learnt in the previous tutorial that JavaScript is zero-based. I have found that this makes it much easier to work with the data from forms in slightly more complicated situations.
I have borrowed the test email code from before to show that the code is easier to interpret when it's more obvious which values are being referred to. Here, I have referenced properties of the NewSubmission object in the body of the notification email using square bracket notation which can be provide greater flexibility than dot notation.
Now imagine that our form is collecting a large amount of data? A quick way of creating the same object as we have above is to create an empty object and then add properties to it. We already have an array of values so we just need to create an array of property names and a loop which combines the two and adds them to our submission object. It may seem trivial in this case as we only have tree properties but perhaps when we look at larger forms taking more data, this will seem more worthwhile.

...Ever wondered what you can do with Google Drive?
Showing posts with label Google Spreadsheets. Show all posts
Showing posts with label Google Spreadsheets. Show all posts
Friday, 9 November 2012

Understanding the Form Submission Trigger
Let's assume you want to automate some of the processing of this data - how can you set up a script which will run whenever somebody submits your form? Well, let's look at our triggers.
To view the triggers for the current scripts, click on the aptly named Current script's triggers in Resources.
Notifications is a really handy feature nestled away with your triggers. If you set up notifications, you will receive an email if your script fails to successfully finish with a little bit of information about what went wrong. Obviously it's helpful to know that there's something to fix as soon as possible and knowing where to start looking will save you some time.
Now you've set up a trigger which will cause your function to run every time somebody submits your form! Let's test it out with a function which will email us a copy of their submission as soon as they submit it. Note; in the spreadsheet of form responses you can opt to receive email notifications every time a form is submitted simply by checking a box (Tools > Notification rules... > A user submits a form) however this is plain notification and doesn't add any detail from the submission.
Before this script will work we need to authorise the script to send email from our account. Copy and paste the script in to your project, make sure you've set up your triggers correctly and click on the save button. Now, click on the Run button (Play icon) and you'll see an authorisation window pop up. You'll need to click the authorise button if you're happy for the script to send email on your behalf.
To view the triggers for the current scripts, click on the aptly named Current script's triggers in Resources.
 |
| Resources > Current script's triggers |
 |
| If you've not set any up yet you'll see this. Click the link! |
 |
| We want a Spreadsheet trigger - specifically from a form submit event |
 |
| While you're here, make sure you set up Notifications |
Now you've set up a trigger which will cause your function to run every time somebody submits your form! Let's test it out with a function which will email us a copy of their submission as soon as they submit it. Note; in the spreadsheet of form responses you can opt to receive email notifications every time a form is submitted simply by checking a box (Tools > Notification rules... > A user submits a form) however this is plain notification and doesn't add any detail from the submission.
Before this script will work we need to authorise the script to send email from our account. Copy and paste the script in to your project, make sure you've set up your triggers correctly and click on the save button. Now, click on the Run button (Play icon) and you'll see an authorisation window pop up. You'll need to click the authorise button if you're happy for the script to send email on your behalf.
Notes on the function
- The function OnSubmit expects one parameter, "e". In this case, e represents the submission event and e.values is an array with values in the same order as they appear in the Spreadsheet (documentation). We asked two questions and each response has a time stamp so each submission will contain three values. As JavaScript is zero-based, the first value is the 0th ("zeroth"), the second value is the 1st, the third value is the 2nd etc.
- "\n" indicates a new line - helpful to make our email easier to read.
And here's the result:
 |
| The fruit of our labour: an automatically generated email |
Create your first Google Apps Script
Creating your first script might seem a little daunting, so if you're nervous you may want to check out the tutorial over at the Google Developers pages. Luckily you can opt to have some code given to you to start off with, so let's have a go.
 |
| I need to stop adding pictures of menus. |
To open the Script editor just click on the tools menu and select Script Editor. The code that you write will be associated with the file that you're working on.
You'll see a dialogue box asking your what sort of script you're going to be writing. If you select the spreadsheet option you'll start with the following pre-populated code. Let's have a look at what the first function means.
 |
| The default Code from the "Spreadsheet" option contains two functions. |
It's much easier to read text rather than pictures of text so from now on I'll be using embedded Gists from GitHub rather than screenshots. This makes it much easier for your to copy and paste snippets in to your own project - which, after all, is what this site is all about.
In order to interact with out spreadsheet, the first hurdle is to work out how to tell GAS which cells we want to work with. The first 4 lines of the readRows function explain where to look for the data we want to use. Firstly we define the active sheet (the one associated with the script) and then we define a range which contains all the data on that sheet. Next we count how many rows there in that range - which can very useful if you need to perform an operation on the data received from each form submission. Finally, all the values in the range are stored in a two dimensional array.
The second part of the function is a simple JavaScript loop which logs the values in each row. The Logs which it generates can be viewed in View > Logs. This may not be terribly exciting yet - but we're making progress.
The second part of the function is a simple JavaScript loop which logs the values in each row. The Logs which it generates can be viewed in View > Logs. This may not be terribly exciting yet - but we're making progress.
Set up a new Google Form
One of the major benefits of using Google Spreadsheets over Excel is that you can quickly and easily collect data from respondents all over the world using Google Forms. Let's set one up right now. Log in to Google Drive and click on Create and then Form. Note - Google is constantly tweaking the layout and design of it's services so don't be too put off if it doesn't look exactly the same as this when you get there!
I have set a up a test form which collects respondent's favourite colour and invites them to give a bit of an explanation. You can see the live form (and add your responses!) and the results.
Note that in the example above I have designated both questions as "Required" which means a user must provide some sort of answer to them in order to submit the form.
Each responses is automatically recorded on to your spreadsheet with a timestamp. The spreadsheet is created at the same time as your form; all forms are attached to a spreadsheet which collects their responses.
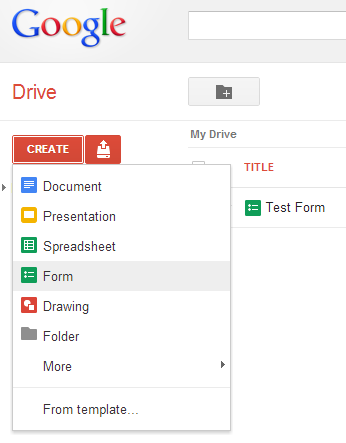 |
| I'm sure you could have found this anyway... |
Now you have a template from which you can add questions and decide what sort of data each should collect.
Points to bear in mind when setting up your form
- Who will be responding? Make sure they understand what you want from them
- Questions in which respondents choose an option mean that you know what the possible answers are going to be. This may be helpful when you're writing a script based on the results.
- Open ended questions (Text or Paragraph Text) allow any text input. If you need a particular type of result like a date, email address or phone number it is impossible to stop users from entering invalid responses. You may need to address this in your script.
 |
| Setting up your form |
 |
| How the form appears to respondents |
 |
| How responses appear on your Google Spreadsheet |
Subscribe to:
Posts (Atom)