Friday, 16 November 2012

Calculating Total Cost

Snippets Bakery's new order form wouldn't be much good if it couldn't provide the total cost of the order to the customer on the confirmation email it sends out. Now that we've recorded the delivery date and calculated how much notice we were given, it's time to total the bill. We're charging for up to three possible items;

  • Cost of the cake - based on size
  • Delivery - based on choice
  • Fast-tracked orders - those with only 3 - 5 days' notice

Cake

Each size option has a cost attached to it to make it simple for the customer to choose the most appropriate. We need to extract this number from the string. As it always comes at the end, but is in slightly different positions, we need to find where it starts - specifically where the "£" is. We've used an indexOf and then converted the string to a number (in base ten) with parseInt.

Delivery

Customers can opt for delivery or collection so we just have to check if the first 8 characters of the response is "Delivery". We've used a conditional operator (a short cut for an if...else statement) to set the cost to 3 if Delivery is selected.

Fast Track

We have three possible routes for orders to take based on how much notice we are given. 
  • Orders with less than 3 days' notice set the declined variable to true as we can't make our delicious cakes at such short notice whilst also managing daily production for the shop.
  • Orders with 3 - 5 days notice are possible but we add a surcharge as it makes it harder for us to plan our work load if. Note that we've tested for "< 6" as we have already dealt with "< 3" within the if statement.
  • Orders with 6 or more days' notice (anything else) present no problem to us so we don't charge extra.
All we have to do now is simply add our variables and then present them in a form that is easy form humans to interpret; we've forced the number to display two decimal places with toFixed and added a currency symbol. All ready to display on our order confirmation!

Wednesday, 14 November 2012

Date math

This short post forms part of our series explaining how the Snippets Bakery developed a new online order form with snazzy order confirmation emails which accurately handles date input. Today we're using those dates so it helps that we've recorded them in a helpful format!

If you've come from VBA then you'll be used to being able to add and subtract dates. In Excel, dates are stored as serial numbers equating to the number of days since 0-Jan-1900 (actually one greater than this number due to a deliberately continued bug in Lotus 123) with time as a decimal portion of a day.

In JavaScript, times are stored as the number of milliseconds since midnight 1-Jan-1970. What does that mean for us if we want to calculate the numbers of days between two dates? Well, firstly we need to get to the milliseconds (quickly achieved with getTime) and then we can subtract the smaller value from the larger - in this case we  are asking users to input a date in the future so we subtract the submission timestamp from this. Then we have with a bunch of milliseconds on our hands so we divide this number by 86,400,000 (the number of milliseconds in a day) and we are left with a number of days. In all likelihood this will be a fraction so I have rounded it down with a Math.floor function.


Tuesday, 13 November 2012

Google Forms and JavaScript Dates

Updated: +Eric Koleda was kind enough to point out JavaScript's date parsing capabilities which are much more elegant than my previous workaround so this post has been edited to avoid leading anyone else astray!

Last time in our Snippets Bakery Project we looked at constructing HTML tables in confirmation emails. This time we're looking at working with dates - crucial when your products have a short shelf life!

One of the most common pieces of information you need to collect in a form is a date. Unfortunately, Google Forms doesn't include a flashy jQuery-like date picker and the most common approach seems to be providing a free text box and hoping that respondents fill in dates in a useful format. However, responses that vary from "Monday" to "Monday the nineteenth of November" to "19-11-2012" are less than ideal if you need to perform calculations based on a specified date.

3 x the fun fields
A work around I have used isn't terribly graceful in that it requires three fields to be filled in but it is relatively simple to code and does the job.

So, what do we want to achieve with this snippet?

  • A date string form that is easily interpreted by humans
  • A JavaScript date instance with which we are able to do arithmetic
  • To avoid any international ambiguity over day and month order


Transatlantic Translation

So how do we go about it? To achieve the third aim I want to build using (shortened) month names in to the specification. It could be argued that naming the field "Month" or the fact that there's only 12 numerical options rather than 31 could be enough but if you were in a hurry and wanted to select the second of January it is conceivable that you could select the first of February in error if you select 1-2. So: month names it is.

To create a human readable date string, all we really need to do is attach the values with a splitter character of your preference. In JavaScript you can easily join strings with the concatenation operator (+)

Handily, JavaScript will parse datestrings in some formats easily so having Months as names doesn't present us with a problem. This post was much simpler than I originally envisaged!


Further reading - 10 ways to format time and date using JavaScript - Working with dates

Saturday, 10 November 2012

Creating a formatted HTML table in an email body

This is the second part of a short series looking at the Snippets Bakery's Project which entails an Order Form and automatic response emails.

Let's take a look at how we got that (relatively!) nicely styled table in to the body of the email. The Google Apps Script MailApp.SendEmail method allows for an HTML body so we could have just hand written the table out as follows (note that we would need to switch the response values to the references to the object properties where the response values are stored - I took the HTML right from my browser console which is why they are just plain text):

Writing out that table would be incredibly tedious and involve a lot of repetition, not to mention that if we want to change any of the variables we would constantly need to edit it - there must be a better way. Luckily, there is. We can get Google Apps Script to write the table for us!

With this code we are aiming to generate all of the HTML we need and add it to the HTMLtable string. We are using a for..in loop to iterate over all of the properties in our NewSubmission object - the object where we stored all of our form response values.

We've adjusted this object slightly so let's have a look at how it's created.

We're still using a for loop as previously discussed however we've add an if..else statement to capture the Section Headings that we've added in. As these aren't associated with any of the response values we need to treat them differently (their values are arbitrarily set as space character, " ", not an empty string for reasons we will arrive at shortly) and we need to adjust the value of i when we pass in e.values[i] as they will be out of sync due to these empty properties we've added. That is why we've added in the variable iSkip, incremented it for each heading and subtracted it from i when getting items from the e.values[] array.

Right, back to our table. Three points to make:

  • As we iterate over the properties in NewSubmission, we've added a check that the length of these properties is non-zero; that is, the question they refer to has actually been answered. This isn't strictly necessary in our case as as each question on our form is designated as "Required" - however there may be situations where this is not the case. This is the reason our the values of our Section Headings properties are not set to empty strings - if they were, this check would eliminate them.
  • We've added a check for Section Headings - defined as property names which start "Section". We format these differently and don't include their values which are inconsequential.
  • Using the modulus operator we check if our table row count is odd or even. If it's odd we apply a different background colour - this is how we achieve the stripped table effect. The row count value starts at zero and is incremented each time we successfully add a row to the HTMLtable string.
  • Finally, don't forget to close the <table> tags outside of the loop or the rest of your email will sit inside your table. It's not a very pleasant sight, I assure you!

Snippets Bakery Project

Now that we know how to set up a Google Form and code a simple notification email based on form submission values that are easier to understand, let's have a look at a more fully-fledged confirmation email with an HTML Table and some date and cost calculations.

This is the Snippets Bakery Order Form and these are the submitted orders. Anyone else hungry? Whilst I was writing this I was pretty disappointed that my orders weren't actually going to result in any cakes being delivered!

The aim of our code is to create something like this confirmation email:

Automatically generated confirmation email with HTML table of responses

In the next few posts I will breakdown various bits of the code and explain how some of the more intricate results were achieved. If you're happy to dive right in, you can get all the code here.


Features and explanatory articles! 

  • Styled HTML Table (formatted with HTML as CSS support in email clients is patchy at best) with responses split in to two sections - part two
  • Work around for the lack of date picker in Google Forms - part three
  • Difference between two dates calculated - part four
  • Total Cost Calculated based on three variables - part five
  • Orders with less than 3 days notice until the fulfilment date are automatically rejected with a polite alternative email.

Friday, 9 November 2012

Creating a usable object from a form submission

The action of submitting a Google Form is an event with an associated array of values corresponding to an ordered list of the user's responses. If you're anything like me and find it easier to work with named variables rather than numbers, creating your own object might help. This way you will be able to reference the values without constantly having to count which question they are taken from - which can be especially confusing as we learnt in the previous tutorial that JavaScript is zero-based. I have found that this makes it much easier to work with the data from forms in slightly more complicated situations.


I have borrowed the test email code from before to show that the code is easier to interpret when it's more obvious which values are being referred to. Here, I have referenced properties of the NewSubmission object in the body of the notification email using square bracket notation which can be provide greater flexibility than dot notation.

Now imagine that our form is collecting a large amount of data? A quick way of creating the same object as we have above is to create an empty object and then add properties to it. We already have an array of values so we just need to create an array of property names and a loop which combines the two and adds them to our submission object. It may seem trivial in this case as we only have tree properties but perhaps when we look at larger forms taking more data, this will seem more worthwhile.

Understanding the Form Submission Trigger

Let's assume you want to automate some of the processing of this data - how can you set up a script which will run whenever somebody submits your form? Well, let's look at our triggers.

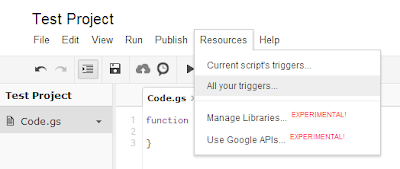
To view the triggers for the current scripts, click on the aptly named Current script's triggers in Resources.
Resources > Current script's triggers

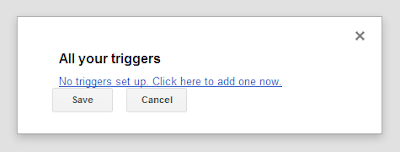
If you've not set any up yet you'll see this. Click the link!

We want a Spreadsheet trigger - specifically from a form submit event

While you're here, make sure you set up Notifications
Notifications is a really handy feature nestled away with your triggers. If you set up notifications, you will receive an email if your script fails to successfully finish with a little bit of information about what went wrong. Obviously it's helpful to know that there's something to fix as soon as possible and knowing where to start looking will save you some time.

Now you've set up a trigger which will cause your function to run every time somebody submits your form! Let's test it out with a function which will email us a copy of their submission as soon as they submit it. Note; in the spreadsheet of form responses you can opt to receive email notifications every time a form is submitted simply by checking a box (Tools > Notification rules... > A user submits a form) however this is plain notification and doesn't add any detail from the submission.


Before this script will work we need to authorise the script to send email from our account. Copy and paste the script in to your project, make sure you've set up your triggers correctly and click on the save button. Now, click on the Run button (Play icon) and you'll see an authorisation window pop up. You'll need to click the authorise button if you're happy for the script to send email on your behalf.

Notes on the function

  • The function OnSubmit expects one parameter, "e". In this case, e represents the submission event and e.values is an array with values in the same order as they appear in the Spreadsheet (documentation). We asked two questions and each response has a time stamp so each submission will contain three values. As JavaScript is zero-based, the first value is the 0th ("zeroth"), the second value is the 1st, the third value is the 2nd etc.
  • "\n" indicates a new line - helpful to make our email easier to read.

And here's the result:
The fruit of our labour: an automatically generated email


Create your first Google Apps Script

Creating your first script might seem a little daunting, so if you're nervous you may want to check out the tutorial over at the Google Developers pages. Luckily you can opt to have some code given to you to start off with, so let's have a go.

I need to stop adding pictures of menus.
To open the Script editor just click on the tools menu and select Script Editor. The code that you write will be associated with the file that you're working on.

You'll see a dialogue box asking your what sort of script you're going to be writing. If you select the spreadsheet option you'll start with the following pre-populated code. Let's have a look at what the first function means.

The default Code from the "Spreadsheet" option contains two functions.

It's much easier to read text rather than pictures of text so from now on I'll be using embedded Gists from GitHub rather than screenshots. This makes it much easier for your to copy and paste snippets in to your own project - which, after all,  is what this site is all about.

In order to interact with out spreadsheet, the first hurdle is to work out how to tell GAS which cells we want to work with. The first 4 lines of the readRows function explain where to look for the data we want to use. Firstly we define the active sheet (the one associated with the script) and then we define a range which contains all the data on that sheet. Next we count how many rows there in that range - which can very useful if you need to perform an operation on the data received from each form submission. Finally, all the values in the range are stored in a two dimensional array.

The second part of the function is a simple JavaScript loop which logs the values in each row. The Logs which it generates can be viewed in View > Logs. This may not be terribly exciting yet - but we're making progress.

Set up a new Google Form

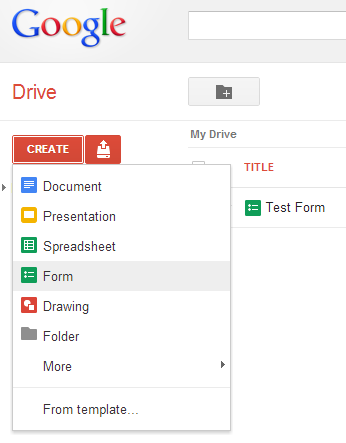
One of the major benefits of using Google Spreadsheets over Excel is that you can quickly and easily collect data from respondents all over the world using Google Forms. Let's set one up right now. Log in to Google Drive and click on Create and then Form. Note - Google is constantly tweaking the layout and design of it's services so don't be too put off if it doesn't look exactly the same as this when you get there!

I'm sure you could have found this anyway...
Now you have a template from which you can add questions and decide what sort of data each should collect. 

Points to bear in mind when setting up your form

  • Who will be responding? Make sure they understand what you want from them
  • Questions in which respondents choose an option mean that you know what the possible answers are going to be. This may be helpful when you're writing a script based on the results.
  • Open ended questions (Text or Paragraph Text) allow any text input. If you need a particular type of result like a date, email address or phone number it is impossible to stop users from entering invalid responses. You may need to address this in your script.


Setting up your form
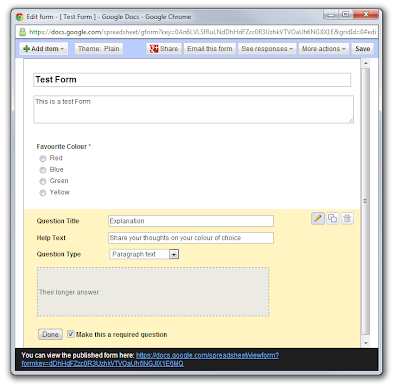
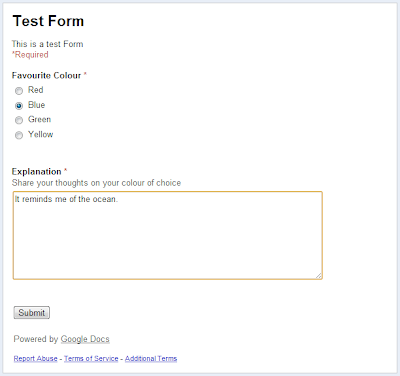
I have set a up a test form which collects respondent's favourite colour and invites them to give a bit of an explanation. You can see the live form (and add your responses!) and the results.
How the form appears to respondents
Note that in the example above I have designated both questions as "Required" which means a user must provide some sort of answer to them in order to submit the form.

How responses appear on your Google Spreadsheet
Each responses is automatically recorded on to your spreadsheet with a timestamp. The spreadsheet is created at the same time as your form; all forms are attached to a spreadsheet which collects their responses.


Hello World

Welcome!

...welcome to my new little blog. If you've stumbled across this looking for something in particular then I hope that what you find will be of some use. Feel free to get in touch or leave a comment if something isn't clear or you have further questions - I can't promise that I'll know the answer but I'll try to help if I can.

What is this?

I started writing Visual Basic for Applications what seems like a very long time ago. relatively recently I realised that I needed to update my skill set as we seem to be headed for the clouds.

Thanks, Disney.
So, I set about teaching myself to achieve the same sort of things that I could with VBA and Excel with Google Spreadsheets and Google Apps Script. Of course, it wasn't long before I discovered I could do some new things too. 

How qualified are you to be dispensing this advice?

I'm really not qualified at all and I imagine that I'll make mistakes and hopefully improve as I go along. Let me know if you spot any glaring errors and I'll do my best to rectify them. Basically to help cement my learning, I'm going to try and document some of my helpful discoveries on this blog. I hope that you find some of it useful too. 

Can I use your code?

Yes,  absolutely! Please feel free to use any of the snippets you find here for any purpose you like. If you feel like this site has been helpful, I'd be grateful if you shared it or tweeted about it, any of that social stuff. I'm just starting out so if you want to help spread the word it would really help.

Where else can I get help?

Google Apps Script is well documented - this should be your first port of call for correct syntax for using Google services. With a background in Excel, I spent a long time reading about the Spreadsheet Services which you might find quite familiar.

Beyond the Google services, Google Apps Script (can we call it GAS from now on? OK, thank you!) is essentially JavaScript which is well documented all over the internet. If you need to brush up on the basics I would thoroughly recommend running through Codecademy's JavaScript Fundamentals Track which is a truly excellent resource. The Mozilla Developer Network also has some great resources, particularly if you are digging a bit deeper.